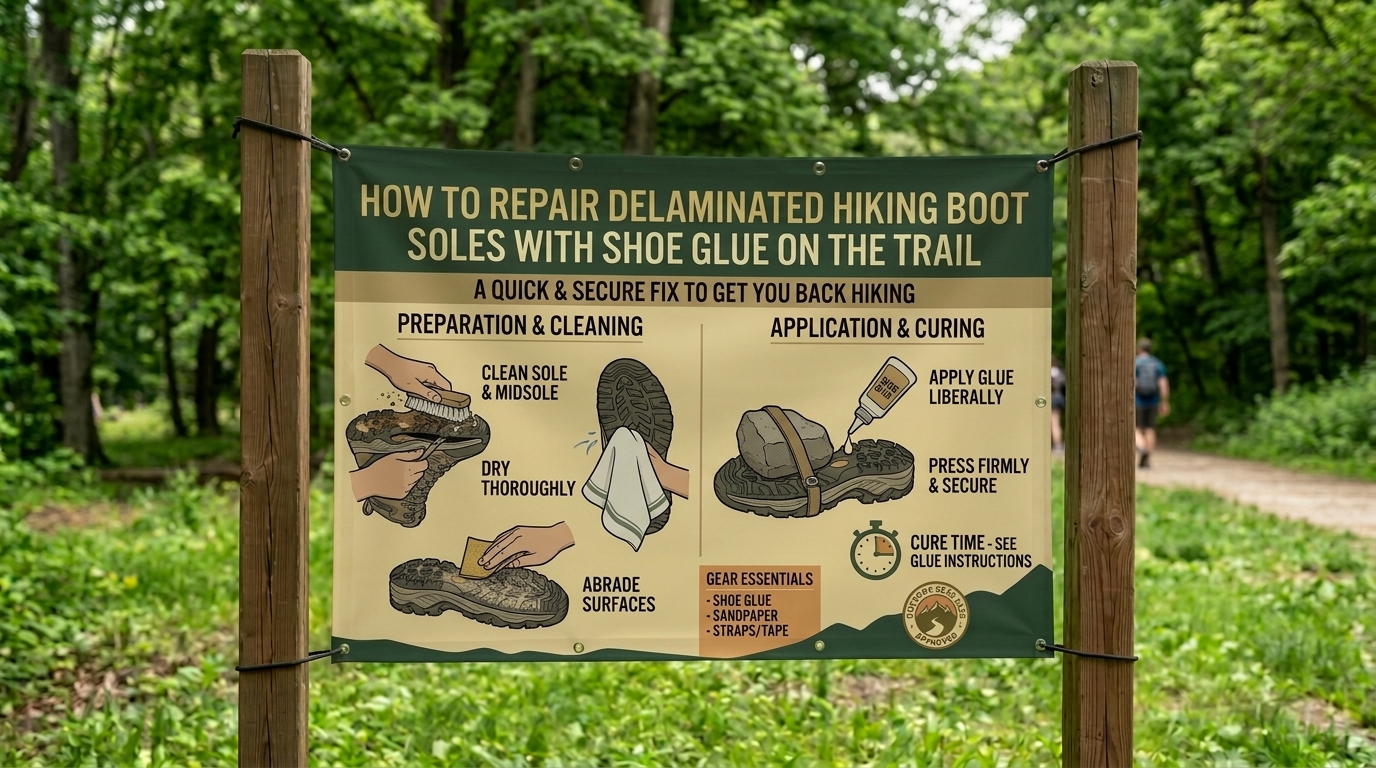
The Ultimate Masterclass: How to Repair Delaminated Hiking Boot Soles with Shoe Glue on the Trail
There is a distinct, deeply unsettling sound that every long-distance trekker dreads: the hollow, rhythmic flap-flap-flap of a boot sole peeling away from the upper. You pause on a rocky outcrop, look down, and realize the toe box of your favorite hiking boot has opened its jaws like a hungry predator. Sole delamination—the structural separation of the rubber outsole from the midsole—is one of the most stressful, frustrating gear failures you can experience in the backcountry.
Whether you are navigating the slippery, slate-strewn paths of upstate New York, grinding up the steep, root-choked switchbacks of Washington’s Cascade Range, pushing through the unforgiving granitic slabs of California’s Sierra Nevada, tackling the urban-to-trail transitions of the San Francisco Bay Area, or navigating the caliche-packed dry trails of Texas, a failing boot sole can quickly turn a dream expedition into a painful exercise in survival.
While your initial reaction might be panic, resignation, or a bitter trudge back to the trailhead, a proper trail-side boot repair can save your footwear, protect your feet, and allow you to finish your journey. This comprehensive, expert-level guide covers everything you need to know about diagnosing, preparing, gluing, and clamping your hiking boot soles back together while miles away from civilization.
1. Anatomy of a Hiking Boot: Why Soles Fail
To fix a boot effectively, you must understand how it is built and why it breaks down. Modern hiking boots are rarely stitched together like traditional leather mountaineering boots of the past. Instead, they are multi-component masterpieces held together by powerful chemical adhesives.
- The Outsole: The bottom layer of durable, high-traction rubber (often Vibram or proprietary rubber compounds) that grips the earth.
- The Midsole: The thick, cushiony layer usually made of Polyurethane (PU) or Ethylene-Vinyl Acetate (EVA) that absorbs shock.
- The Upper: The leather, synthetic mesh, or nubuck fabric that houses your foot.
The Culprits Behind Delamination
- Hydrolysis (Chemical Aging): This is the silent killer of modern boots. Polyurethane midsoles are susceptible to moisture absorption over time. If your boots sit in a dark closet, garage, or basement for a year or two without use, moisture breaks down the chemical bonds from the inside out. The next time you step down hard on a rock, the adhesive bond shears effortlessly.
- Thermal Shock: Leaving your boots in the trunk of a hot car in Texas or California, or placing them too close to a roaring campfire in Washington, can soften adhesives and warp synthetic components.
- Mechanical Shearing: Constant leverage against jagged rocks, scree slopes, and logs acts as a persistent wedge, forcing tiny gaps in the toe or heel wider with every step.
2. The Backcountry Repair Kit: What to Pack
Do not wait for a failure to think about tools. If you are venturing into remote terrain, your emergency kit should always include a lightweight, targeted boot-repair module.
- The Adhesive: Never rely on standard hardware store super glue. Cyanoacrylate dries glassy, brittle, and shatters instantly under flex. You need a flexible, urethane-based adhesive. The industry standard is Shoe Goo, but for a superior, industrial-strength bond, look for Aquaseal SR (or Gear Aid Aquaseal +FD) or Barge All-Purpose Cement.
- Surface Prep Pads: An alcohol prep pad or a tiny folded piece of 80-grit sandpaper / an emery board.
- Scraper/Brush: A small wire brush or stiff toothbrush to dig out stubborn dirt.
- Clamping Gear: Heavy-duty rubber bands, two or three heavy-duty zip ties, or a short length of strong utility cord/paracord.
- Protection: A pair of nitrile gloves to keep industrial chemicals off your skin.
3. Step-by-Step Field Guide: Executing the Trail-Side Glue Job
When disaster strikes mid-hike, follow this meticulous sequence to ensure your repair holds long enough to get you back safely.
Step 1: Clean and Decontaminate the Gap (The Make-or-Break Step)
Adhesives will not bond to dirt, moisture, dried sweat, or old flaky glue.
- Peel the sole open as far as it comfortably goes without tearing the remaining fabric.
- Use a stick, a brush, or the edge of a multi-tool to scrape away all mud, sand, pine needles, and decayed old glue from the interior surfaces.
- If you have an alcohol wipe, scrub the exposed rubber and midsole thoroughly.
- Dryness is critical: If it’s raining, find shelter under a rock overhang, tent vestibule, or tarp. Use your breath or body heat to warm and dry the mating surfaces as much as possible.
Step 2: Mechanical Abrasion (Roughing It Up)
Smooth rubber and slick polyurethane offer poor surfaces for glue adhesion.
- Take your sandpaper or emery board and vigorously scuff both the underside of the midsole and the top of the rubber outsole.
- No sandpaper? Find a rough, abrasive piece of granite or sandstone on the trail and rub the surfaces against it to create micro-scratches. This mechanical “tooth” is what the glue anchors into.
Step 3: Apply the Urethane Adhesive Correctly
- Squeeze a generous, even ribbon of your urethane adhesive (like Shoe Goo or Aquaseal) into the entire cavity.
- Ensure total coverage from edge to edge. Do not skimp; you need enough thickness to bridge any gaps where the original factory glue completely disintegrated.
- The Tactile Window: For many urethane cements, letting the glue sit exposed to the air for 5 to 8 minutes before pressing them together allows the solvents to flash off, drastically increasing initial tackiness. (Check your specific tube’s instructions if possible).
Step 4: Compression and Clamping
- Press the sole back into its exact original alignment. Squeeze it tightly with your hands for 60 to 90 seconds to force out air bubbles and ensure complete contact.
- Because you don’t have a workbench vise on the trail, you must improvise compression:
- Method A: Wrap heavy-duty rubber bands tightly and repeatedly around the boot in a spiral pattern over the glued zone.
- Method B: Cinch down heavy-duty zip ties across the sole and upper, pulling them as tight as humanly possible.
- Method C: Use a length of paracord wrapped tightly in a criss-cross fashion around the forefoot or heel.
Step 5: Curing Time management
- While laboratory-grade curing takes 24 to 48 hours, a trail-side emergency requires compromise.
- If you can afford to take an extended lunch break, set your boots in the sun (warmth accelerates urethane curing, but avoid extreme heat) and let them sit for 2 to 4 hours under pressure.
- If you must keep moving immediately, let them cure for as long as safety allows, then walk consciously—avoiding kicking rocks, pivoting sharply on your toes, or stepping into deep mud.
4. Advanced Field Hacks for Catastrophic Failures
What happens when things go completely wrong and the sole doesn’t just peel at the toe, but detaches entirely?
- The Mummy Wrap Technique: If an entire sole falls off, clean the surfaces as best as you can, apply a heavy layer of glue across the entire bottom of the boot, press the sole back on, and use an entire roll of duct tape or continuous paracord to wrap the boot completely from toe to heel like a mummy. It looks crude, but it creates mechanical pressure and keeps the sole from catching on brush.
- Stitch-and-Glue Improv: If you carry an emergency sewing awl or heavy dental floss in your survival kit and your boot has a rand with a fabric lip, you can puncture through the upper fabric and stitch the sole back to the upper loosely, then apply shoe glue over the stitches to seal it.
5. Preventative Maintenance: Stop Delamination Before It Starts
Prevention is always superior to emergency surgery in the backcountry. Incorporate these habits into your outdoor routine:
- The Pre-Trip Flex Test: Two weeks before any major backpacking trip, take your boots out of storage. Grab the toe and heel and twist them in opposite directions. Look closely at the toe bumper and heel rand for hairline gaps or whitening of the adhesive line.
- Proper Off-Season Storage: Never store your hiking boots in hot car trunks, uninsulated metal sheds, or damp basements. Keep them in a temperature-controlled, dry environment inside your house.
- Post-Hike Cleaning: Wash mud and chemical run-off off your boots after every trip. Mud holds moisture against the midsole boundary, accelerating hydrolysis.
6. Frequently Asked Questions (FAQ)
1. Can I use standard Super Glue or Gorilla Glue for a trail repair?
No. Standard cyanoacrylate (super glue) and standard polyurethane Gorilla Glue dry completely rigid and brittle. Hiking boots must flex with every step. A rigid glue bond will instantly snap under the natural bending motion of your foot, leaving you right back where you started. Always use flexible urethane formulas like Shoe Goo or Aquaseal SR.
2. How long do I need to let shoe glue cure before hiking again?
Ideally, urethane shoe glues require 24 to 48 hours to reach 100% structural integrity. In an emergency on the trail, giving it a minimum of 2 to 3 hours under tight compression will usually provide enough bond strength to let you hike out safely, provided you tread carefully.
3. What should I do if the sole falls completely off?
Clean both mating surfaces of dirt and old debris, apply a thick layer of urethane glue across the entire bottom, realign the sole precisely, and wrap the entire boot tightly with heavy-duty duct tape or paracord to act as a clamp. Walk slowly and steadily back to civilization.
4. Does duct tape work well as a standalone fix for a loose sole?
Duct tape is an excellent temporary backup, but it struggles to maintain grip on wet, dusty boot rubber. If you use duct tape, wipe the area clean first, wrap the tape tightly around the forefoot to prevent the loose flap from catching on roots, and reinforce it with cordage if possible.
5. Will shoe glue damage my boots’ waterproof membrane (like Gore-Tex)?
No. External shoe glues are applied entirely to the exterior rubber and midsole boundaries. They do not penetrate through the thick leather/synthetic uppers into internal waterproof booties, as long as you do not puncture the inner lining with sharp tools during cleaning.
6. Why did my relatively new hiking boots suddenly delaminate?
The primary culprit is hydrolysis. If boots sit un-worn in a box or a dark closet for a couple of years, ambient humidity slowly breaks down the polyurethane chemical bonds in the midsole. When you finally take them out on a strenuous hike, the old adhesive fails instantly under stress.
7. Can I use a camp stove or a lighter to speed up the drying process?
Never use open flames, camp stoves, or high-heat devices to accelerate shoe glue curing. Excessive heat can warp the rubber outsoles, melt synthetic uppers, boil the solvents inside the adhesive, and create a weak, porous, spongy bond that fails immediately.
8. Is a trail-side glue repair considered permanent?
Treat a trail-side repair as an emergency tactical fix. While it can sometimes hold for a surprising length of time, it is meant to get you off the mountain. Once you return home, peel away the temporary patch, thoroughly clean the area, and execute a proper workbench repair or take the boots to a professional cobbler.
9. What is the difference between Shoe Goo and Aquaseal SR?
Shoe Goo is a thick, paste-like rubber compound that is exceptional for filling large gaps and rebuilding worn-out tread lugs. Aquaseal SR (Shoe Repair) is a specialized liquid urethane formula that flows deep into microscopic pores, offering superior flexibility and a remarkably tenacious bond for high-flex areas.
10. How can I pack shoe glue safely in my backpack without a mess?
Instead of carrying a heavy, full-sized retail tube that might puncture under gear pressure, squeeze a couple of ounces of Shoe Goo or Aquaseal into a small, lightweight plastic travel squeeze tube or a small pill container, or simply carry a compact 0.75 oz mini tube in your first-aid kit.
Conclusion
A delaminated hiking boot sole feels like a catastrophic crisis when you are miles deep into the wilderness, but it doesn’t have to spell the end of your adventure. Armed with a compact tube of flexible urethane adhesive, a bit of resourcefulness for cleaning and clamping, and a patient mindset, you can successfully patch your footwear and keep moving forward. Always inspect your gear before heading out into rugged landscapes—from the damp trails of the Pacific Northwest to the rocky crests of the Northeast—and you will remain ready for whatever challenges nature puts in your path.
What specific type of hiking terrain or footwear style are you preparing for on your upcoming outdoor expedition?
Leave a Reply