Hitting the trail should be an absolute pleasure, but there are few discomforts on a hike quite as agonizing as heel slippage and bruised, sore toes. With every uphill step, your heel lifts out of the pocket, creating friction and developing into raw blisters. Then, when gravity pulls you down the mountain, your foot slides forward, smashing your toes repeatedly against the front of your boot. By the end of the day, you are left with agonizing pain, lost toenails, and ruined morale.
The culprit isn’t always poor boot sizing; more often than not, it is improper lacing. Your feet change shape throughout the day, swell in the heat, and shift depending on the incline. Utilizing specialized lacing techniques allows you to customize the fit of your boot dynamically.
Whether you are navigating steep switchbacks in California, traversing damp mountain passes in Washington, handling rocky trails in Texas, or escaping New York and San Francisco for weekend backpacking trips, mastering proper boot lacing will transform your comfort on the trail. This comprehensive guide details advanced lacing methods, professional tips, and troubleshooting strategies to keep your feet secure and pain-free.
Why Heel Slippage and Sore Toes Happen
Before looking at solutions, it helps to understand the mechanical forces at play inside your hiking boots.
When you lace a boot uniformly tight from top to bottom, you treat your foot like a rigid block. However, human feet are dynamic structures. Your forefoot needs room to splay naturally, your midfoot needs a secure lockdown to prevent lateral sliding, and your ankle needs to be held firmly back into the heel pocket without cutting off circulation.
- Causes of Heel Slippage: If the instep (the top of your foot) isn’t locked down securely, your entire foot slides forward and backward inside the boot. Every time your foot lifts, the heel separates from the counter, creating friction against your sock and skin.
- Causes of Sore and Black Toes: Toe jam happens when your foot isn’t anchored at the ankle or midfoot. On descents, momentum drives your foot forward. If your laces aren’t holding your instep back, your toes crash violently against the interior toe box, bruising the nail beds and causing extreme pain.
Step-by-Step Lacing Techniques to Fix Fit Issues
Standard factory lacing (the classic criss-cross method) is a one-size-fits-all approach that rarely addresses specific anatomical quirks or terrain challenges. By implementing these specialized lacing techniques, you can completely alter how your boot fits.
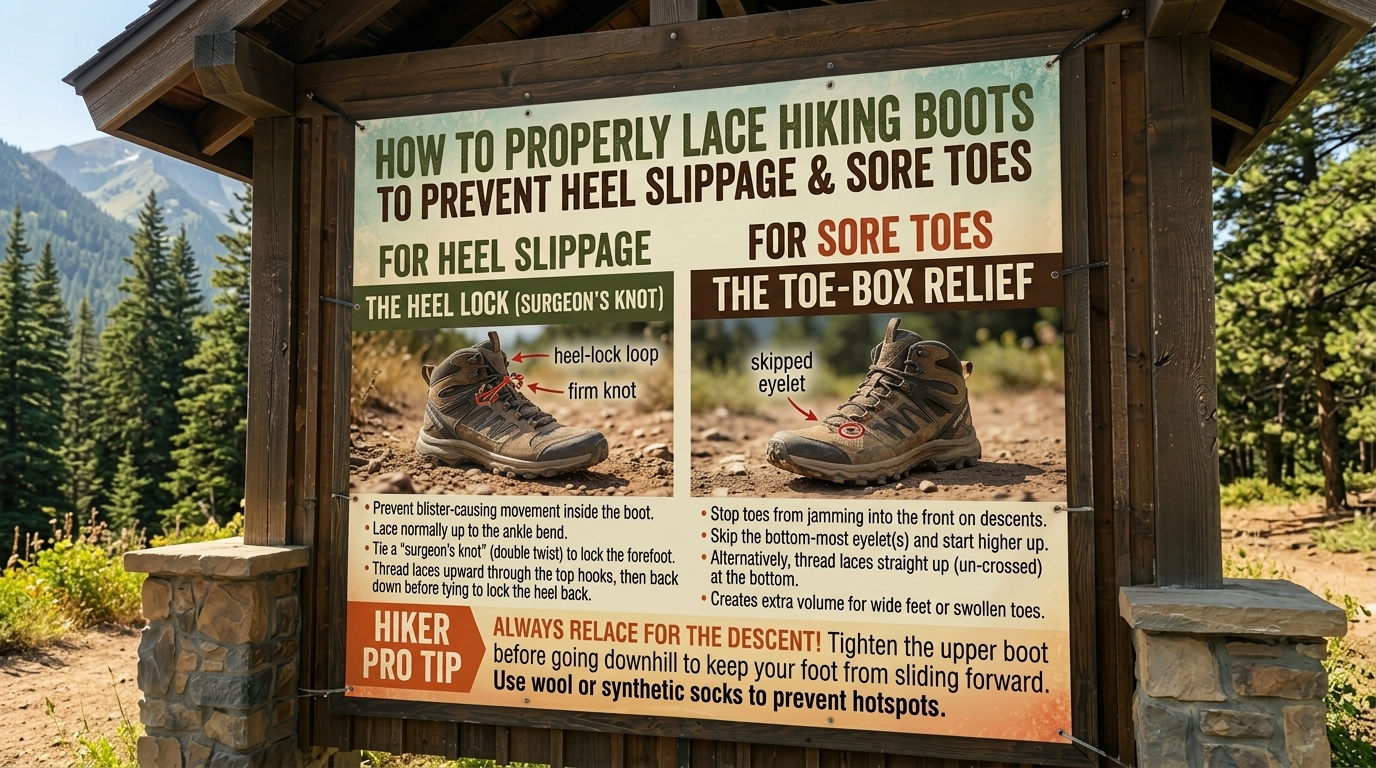
1. The Surgeon’s Knot (The Ultimate Heel Lock)
If your heels constantly slip up and down regardless of how hard you yank your laces, the surgeon’s knot is your best friend. This technique creates a specialized friction lock at the ankle eyelets, preventing upper lace tension from loosening.
- How to Tie It:
- Lace your boots normally up to the eyelet just below where the ankle flexes.
- Take both lace ends and loop them around each other twice (like an overhand knot with an extra twist).
- Pull the laces outward to cinch the loop tight against the eyelet. The double twist creates internal friction that stops the lace from slipping backward.
- Continue lacing up through the remaining speed hooks or top eyelets normally and tie your final bow.
2. Window Lacing / Box Lacing (Relieving Pressure on the Top of the Foot)
If you have high arches or suffer from dorsal foot pain (where the tongue of the boot presses too hard against the top tendons), standard lacing can cause numbness and throbbing. Window lacing creates a “relief bridge” over the sensitive spot.
- How to Tie It:
- Skip the standard criss-cross over the exact spot where you feel pressure.
- Instead of crossing the laces diagonally, run them straight up vertically to the next set of eyelets.
- Resume your normal criss-cross pattern above the pressure point. This distributes tension around the sensitive area while maintaining overall foot security.
3. Toe-Relief Lacing (Creating Space for Wide Forefeet and Bunions)
If your forefoot feels pinched or your toes are squished together, you need to reduce tension across the toe box before the laces even reach the midfoot.
- How to Tie It:
- Start by threading your laces straight across the very bottom two eyelets (creating a horizontal bar rather than an X).
- Leave the next set of eyelets completely unlaced, or run the laces loosely.
- Begin your standard criss-cross lacing higher up on the midfoot where you actually need structural lockdown. This frees up the toe box to expand naturally.
The Ultimate Pre-Hike Lacing Strategy: Uphill vs. Downhill Adjustments
Your lacing shouldn’t be a “set-it-and-forget-it” task. Experienced hikers adjust their laces dynamically based on the topography of the trail.
Adjusting for Steep Ascents (Going Up)
When climbing steep hills, your ankles flex forward constantly.
- The Strategy: Keep the ankle hooks slightly looser than normal to allow your ankle joint full range of motion without the collar digging into your Achilles tendon. However, keep the midfoot locked down so your foot doesn’t slide backward inside the boot.
Adjusting for Steep Descents (Going Down)
Going downhill is when toe trauma and heel slip peak.
- The Strategy: Before you hit a long descent, pause and retie your boots. Tap your heel firmly on the ground to slide your foot all the way back into the heel pocket. Use the Surgeon’s Knot at the ankle to lock your heel firmly in place, and pull the midfoot laces snugger than usual to anchor your foot so it cannot slide forward into the toe box.
Essential Tips for Preventing Boot Blisters and Foot Pain
Beyond changing how you lace your boots, incorporating these proactive foot-care habits will completely eliminate trail-induced misery:
- Upgrade Your Socks: Never wear 100% cotton socks on a hike. Cotton absorbs sweat, swells, loses its shape, and creates massive friction blisters. Always wear high-density, moisture-wicking merino wool or synthetic socks.
- Consider Toe Socks or Liners: If your toes rub against each other, causing blisters between the digits, wearing thin toe socks (like Injinji) completely eliminates skin-on-skin friction.
- Check Your Insoles: Factory insoles are often flimsy foam pads that offer zero arch support. Without proper arch support, your foot flattens out and spreads wider under a load, pushing your toes forward into the front of the boot. Upgrading to supportive aftermarket insoles locks the foot’s arch into place.
- Keep Your Toenails Trimmed Short: Long toenails act like tiny hammers against the front of your boot on descents. Trim your toenails straight across a day or two before every major hike.
Frequently Asked Questions (FAQs)
1. Why does my heel keep slipping even when my boots are tied tightly?
If your heel slips despite tight laces, your boots may be slightly too long, your heel pocket might not match your foot shape, or your instep isn’t being held down properly. Try using the Surgeon’s Knot to anchor your ankle back into the heel pocket.
2. How can I stop my toes from hitting the front of my boots when going downhill?
Toe jamming is caused by forward foot sliding. Retie your boots before descents by kicking your heel back, cinching the midfoot snugly, and using a locking ankle knot to keep your foot anchored in the rear of the boot.
3. Should I lace my hiking boots differently for uphill vs. downhill hiking?
Yes! Loosening the ankle slightly on long ascents gives your ankle better flexibility, while tightening the ankle and midfoot securely before descents prevents forward sliding and toe trauma.
4. What is a Surgeon’s Knot and how does it work?
A Surgeon’s Knot involves twisting the laces around each other twice before pulling them tight against an eyelet. The extra twist creates friction that prevents the lace from loosening under tension, acting as a mechanical lock.
5. Can incorrect lacing cause numbness in my feet?
Absolutely. Lacing your boots too tightly across the top of your foot (the instep) compresses the superficial nerves and blood vessels, leading to numbness, tingling, and cold toes. Use window lacing to relieve this pressure.
6. Are my boots too small if my toes hurt on downhills?
Not necessarily. While a boot that is a full size too small will cause toe pain, even a perfectly sized boot will cause your toes to slam into the front if your foot isn’t locked down properly at the instep and ankle.
7. How do I know if my hiking boots are the right width?
When laced up, your toes should be able to wiggle freely from side to side, and the sides of your feet should not bulge over the edges of the midsole platform. If your forefoot feels pinched, use toe-relief lacing.
8. Does sock thickness affect heel slippage?
Yes. Wearing socks that are too thin can leave extra volumetric space inside the boot, causing your heel to lift. Conversely, socks that are too thick can crowd your toes and cut off circulation. Match your sock thickness to the interior volume of your boot.
9. What should I do if my boots are broken in but still slip at the heel?
In addition to the Surgeon’s Knot, you can insert heel lock pads (adhesive foam strips placed inside the heel counter) or switch to a thicker volume sock to fill the excess space.
10. How often should I check or adjust my laces during a hike?
It is normal for leather and synthetic boots to stretch slightly and for your feet to shift during the first mile or two of a hike. It is standard practice to stop after 15–20 minutes of hiking to fine-tune your lace tension.
Conclusion
Sore toes and heel slippage are two of the most common trail complaints, yet they are entirely preventable. By moving away from factory lacing habits and mastering specialized techniques like the Surgeon’s Knot, window lacing, and dynamic terrain adjustments, you can completely customize the fit of your boots on the fly. Take control of your comfort, protect your feet from friction and trauma, and hit the trail with absolute confidence on your next outdoor adventure.
Leave a Reply